If you want to build a passive income stream, Google Adsense make money while you sleep, and enjoy the internet lifestyle, consider monetizing your website with Google Adsense.
Google Adsense is the world’s number one advertising network that allows publishers, content creators, and website owners to make money by displaying relevant ads to their visitors.
To get started, you must add Google Adsense to your WordPress site and verify your website ownership.
If you don’t know how to do that, don’t worry.
In this article, I’ll share the step-by-step process of adding Google Adsense to your WordPress website.
Let’s dive in.
Why Adding Google Adsense To Your WordPress Site is Worth It
Consistent, scalable, and reliable passive income is every internet marketer’s dream.
Google Adsense makes it a reality.

Launched in 2003, Adsense is the world’s premier advertising network that more than 3 million active websites use to monetize their content.
It was one of the first advertising platforms to reward publishers for displaying ads on their sites. Almost two decades later, it’s still used by global brands and publishers like BBC, The New York Times, Business Insider, and millions of other sites.
By adding Google Adsense to your WordPress site, you can instantly monetize your content and become a part of an ever-growing Google publisher community.
Here are seven core benefits of Adsense that make it such a popular advertising platform.
Easy To Get Started
Getting started with Google Adsense is a simple process. If you have a Google account, you can simply sign up for Google Adsense, copy the Adsense code to your site, and start making money as soon as your site gets the Adsense team’s approval.
The whole process usually takes 24-48 hours to complete unless your site doesn’t comply with Google’s guidelines.
Strict Quality Control
Google Adsense has maintained its value for advertisers and brands because of its strict quality control over publisher sites. Your site needs to publish original, accurate, and high-quality content to become an Adsense publisher. Adsense moderators are quick to reject low-quality sites and any publishers from niches such as gambling and porn.
Highly Relevant Ads
When it first started, Adsense used to show ads based on the content of a page. But over the years, it has evolved into an intelligent advertising platform that now displays ads according to a visitor’s interests and search patterns. As a result, your visitors are much more likely to click on your ads and help you make more money.
Major Advertisers Onboard
Because of Google’s credibility and strict quality control, the world’s biggest brands and advertisers use Google Ads to market their products.
Support For Diverse Niches
Publishers from any niche (except for porn and gambling) can make money with Google Adsense because of its seemingly unlimited pool of advertisers.
Attractive Pay Per Click
You can earn anywhere from $0.2 to $15 per click as an Adsense publisher. However, most niches pay around $1-3 per click.
Highly Scalable
Once you add Google Adsense to your site, there’s no limit to how much money you can earn from it. The more content you publish and the more traffic your site gets, the more money you can make from clicks on Google Adsense units on your site.
How Google Adsense Works
Google is primarily an advertising company. Search, Maps, YouTube, Chrome, Hangouts, and all other Google products are ways to gather user data.
Since Google has so much consumer data, it’s an ideal partner for brands and advertisers looking to reach their prospects.
Google Adsense works in coordination with Google Ads. Advertisers, brands, and businesses use Google Ads to create advertising campaigns and choose their target audience.
Google recruits publishers and content creators who want to make money by showing ads on their sites and content through its Adsense program.
When an advertiser runs an ad campaign, Google displays those ads on the sites and platforms registered with Google Adsense.
The advertisers pay Google based on the number of clicks or impressions on their ads. Google applies the same model to Adsense and pays bloggers, publishers, and website owners based on the ad clicks generated through their content.
In competitive niches, advertisers are prepared to pay more per click than the less saturated industries.
Naturally, the publishers in such niches also earn more per click from Adsense.
Some of the highest paying Adsense niches include insurance, mortgage, legal services, SaaS, loans, etc.
That’s the whole business model of Google Adsense.
The Investment Needed To Add Google Adsense To WordPress
What does it take to add Google Adsense to your WordPress site?
For starters, you need access to your WordPress site’s admin panel so that you can copy the Adsense code to it.
And of course, you’ll need an approved Adsense account that you can link with your site and use to create different ad units for your content.
You don’t necessarily need any financial investment to link Adsense with your WordPress site since Adsense is a free service.
If you have time, you can complete the whole process yourself. If not, you can hire a freelancer to do it for you.
There are three different ways to connect your WordPress site with Google Adsense and start displaying ads:
- Manually copy the Adsense code to your site
- Use a WordPress plugin to add the Adsense code
- Use Auto Ads
I’ll explain each of these methods in the next section.
4 Easy Steps To Add Google Adsense To Your WordPress Site
Adding Google Adsense to your WordPress site is an easy three-step process.
Let me explain each step in detail.
Step 1: Create An Adsense Account
If you have a Gmail account, you already have a Google Adsense account as well. If not, you’ll first need to sign up for a Google account.
After that, follow these steps to sign up for Google Adsense.
Go to the Google Adsense website.
Click Get Started in the top right to open the account sign-up page for your website.

Enter your website URL and email address.

Click Save and continue.
On the next page, choose your country and accept the Terms & Conditions.

Click Create Account.
On the welcome screen of your account, click Get Started to go to the Payment address details page.
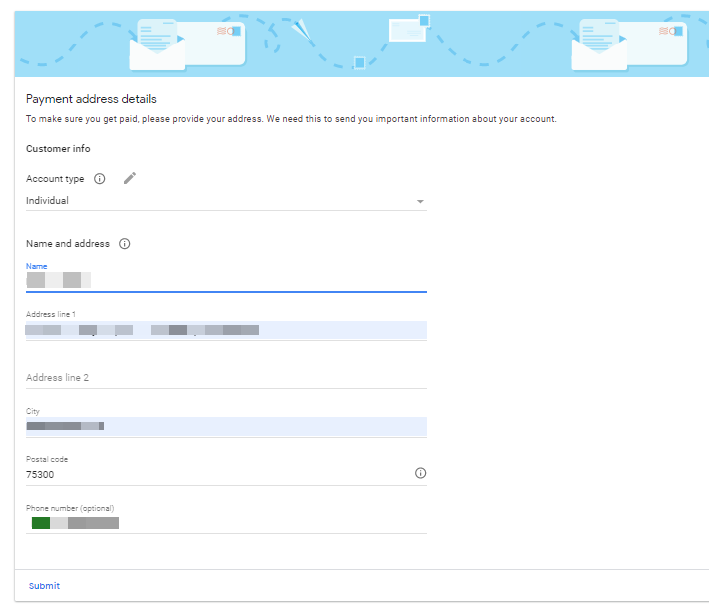
Choose your account type (individual.), add your full name, address, and phone number, then click Submit to complete the account set up.
In the next step, you’ll add your site and get your tracking code.
Step 2: Add Your Site To Google Adsense
In this step, you’ll need to submit the website on which you want to display ads for Google Adsense approval.
Here’s how to do it:
In your Adsense account’s side menu, click Sites.

On the next page, click Add Site.

Now add the URL of the site where you want to display ads.
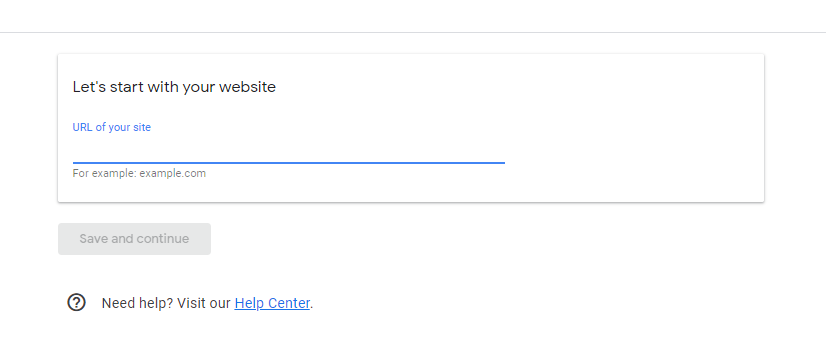
Click Save and continue.
On the next page, copy your site’s unique Adsense tracking code.

Before clicking Request Review, you’ll need to copy the Adsense code to your WordPress site.
Step 3: Add Google Adsense Code To Your Site
There are different ways to copy the Adsense code to your WordPress site.
Let me explain them one by one.
Using A Plugin To Add Google Adsense
The safest method of adding the Adsense code to your WordPress site is by using a plugin.
Because with this method, your code will stay unaffected even if you change your site’s theme.
There are many plugins for this purpose, but we’ll use Advanced Ads to demonstrate.
Download and install Advanced Ads to your WordPress site (read this guide to learn how to install a WordPress plugin).
In your WordPress site’s dashboard, go to Advanced Ads → Settings.
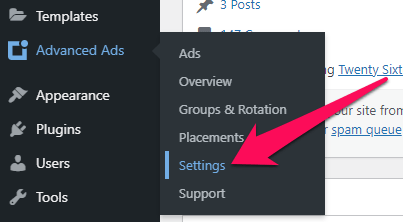
In the plugin’s admin section, click the Adsense tab.

On the next page, click Connect To Adsense to start the process of connecting your Adsense account to your WordPress site.

Choose the relevant Google account to connect with your WordPress site.
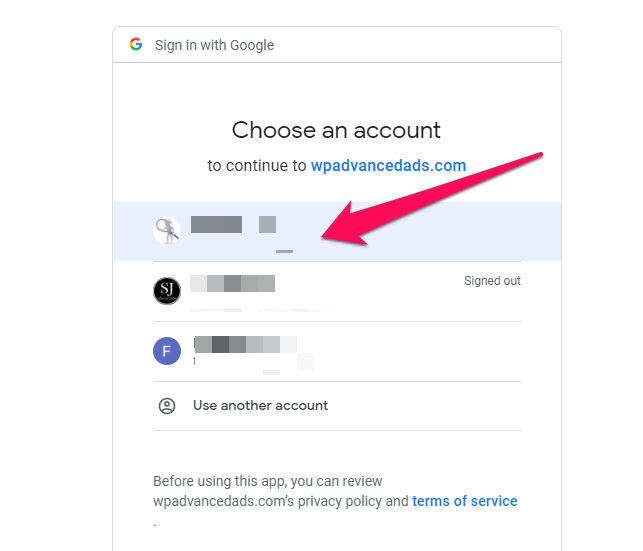
Click Allow to grant permission.

Click Allow once more to complete authorization.

You will be redirected to the plugin’s dashboard page, but this time it will have all the information from your Google Adsense account.
To add the Google Adsense verification code to your site, enable the check box next to Verification code.
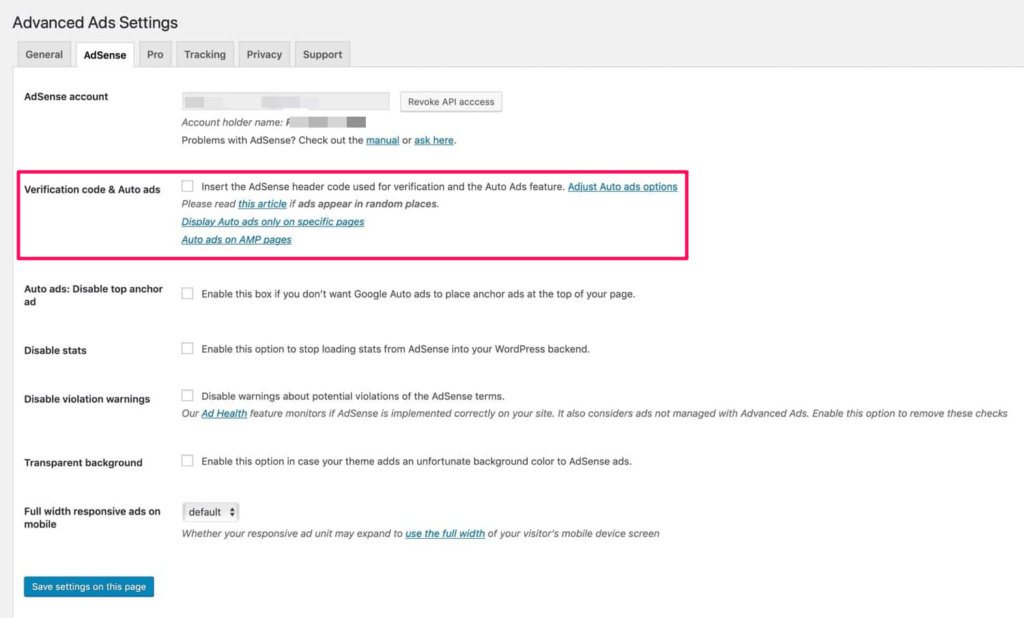
Click save settings to finish the setup
Advanced Ads will fetch the tracking code from your Google Adsense account and copy it to your site’s header code. You don’t need to change the code manually.
Now go back to the Adsense window we left in the previous step and click Request Review.

If you’ve added the code correctly, you should see the confirmation message from Google Adsense.

Your account has been successfully submitted for review.
You should get an approval email soon (unless your site is entirely new or doesn’t fully comply with Adsense policies).
Manually Adding Google Adsense
You can also manually add the Google Adsense code to your site by copying it to your site’s code.
However, we don’t recommend this method because most users simply add the code to their site’s header.php file.
There’s nothing wrong with this method if you never plan to change your website theme. But if you change your theme, you’ll need to reinsert the code.
But there’s a workaround to this problem.
Here are a couple of ways you can manually add the Adsense code to your site.
Adding Code To Your Site’s Header
You need to copy/paste your Google Adsense code to every page you want to display ads.
In WordPress, instead of pasting your code separately to every page, you can add it to your site’s header.php file since WordPress loads this file on every page of your site.
But instead of directly editing header.php, we recommend using a plugin called Header and Footer Scripts.
Here’s are the steps to add the Adsense code to your site’s header.
Login to your WordPress site’s dashboard.
Download and install the Header and Footer Scripts plugin.
In your WordPress dashboard, go to Settings → Header and Footer Scripts.

Copy/paste your Adsense tracking code in the box titled Scripts in header.

– Click Save Settings.

That’s it, you’ve successfully added the Adsense script to your site’s header.php file without tinkering with the code directly.
Now, go back to your Adsense account and submit your site for review.
Adding Code To A Widget
If your theme has a sidebar, you can add the Adsense code to your site’s pages using a custom widget.
Here’s how to do it.
Log in to your WordPress site’s dashboard.
Go to Appearance → Widgets.

On the Widgets page, click on the Custom HTML widget and drag it to the Sidebar section.

Paste your Adsense code in the Custom HTML text box.

Click Save.
You’ve successfully added the Adsense code to your site’s sidebar.
Go back to your Adsense account and submit your site for review.
Step 4: Create Ad Units For Your WordPress Site
After Google Adsense approves your site, you can start displaying different types of ads in your content.
Adsense gives you various options for creating ads and allows you to display them anywhere on your site.
Here’s the process for creating an ad for your WordPress site.
Sign in to your Google Adsense account.
On the homepage, click Ads.
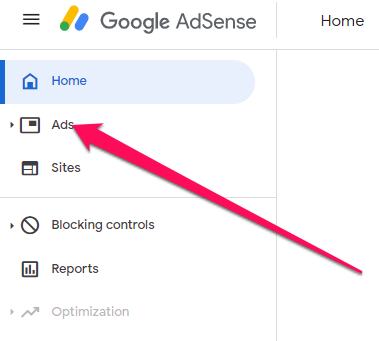
In the Ads section, go to the By ad unit tab. Here, you’ll see three different ad types: Display ads, In-feed ads, In-article ads.

Click on Display ads to open the ad creation page.
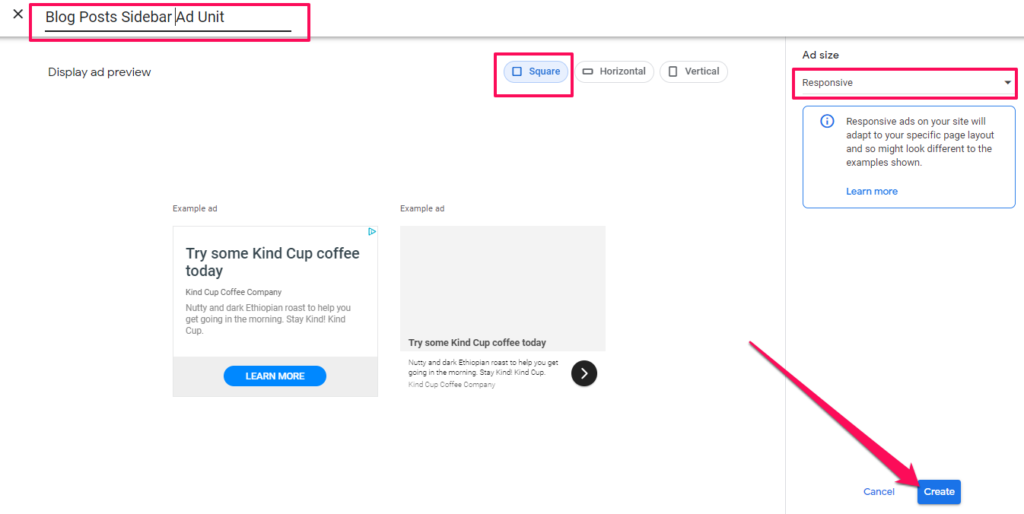
Give your ad unit a name, choose the ad layout (square), and from the Ad size menu, choose Responsive if you want your ads to adapt according to the visitor’s device.
Click Create.
Copy the ad unit’s code by clicking Copy code snippet.

Paste this code anywhere you want to display the ad on your site. For example, if you’re going to display this ad in your site’s sidebar, use a Custom HTML the same way we did when adding the Adsense tracking code in Step 3.
Once you copy and paste the code to your site, the ad might take a few minutes to appear.
You can view your ad unit’s stats and edit its appearance from the Ads section in your Google Adsense account.
Next Steps
As I’ve shown you in this article, adding Google Adsense to your WordPress site is a pretty simple process.
However, to increase your Adsense earnings, you need to constantly optimize your ads by analyzing the performance of individual ad units and trying different ad types and positions on your site.
Once you find the ad location and type that works the best on your site, apply it to all your site’s pages and remove any unnecessary ad units.

